

Transform your outdoor mornings into a caffeinated paradise. From portable espresso makers to lightweight pour-over setups, there are plenty of options available to satisfy even the most discerning coffee connoisseur. We’re going to cover the best brewing methods for the perfect cup of camping coffee. No more sacrificing quality for convenience.
It’s time to level up your camping coffee experience with this guide to brewing exceptional coffee in the wild.
Jump to Section
Know a coffee lover who needs this?
SHARE THIS GUIDE
Things to Consider
Brew Method: There are several styles of coffee making that are suitable for camping, including French Press, Pour-Over, Stovetop Espresso, and Portable Espresso Makers. We recommend sticking to a method you’re familiar with at home. If you want to explore other brewing methods, perfect it at home before taking it to the campsite. Consider your style of camping and level of commitment to making the perfect cuppa.
Size and Weight: are you a hiker and carrying your gear on your back? Or travelling in a campervan where weight isn’t an issue but space is?
Single or Group Coffee (Volume): are you making single espresso shots for you and your partner or do you have a whole crew that need to be caffeinated in the morning?
Speed: Do you have time and patience to grind your beans and patiently bloom your pour-over? Or do you prefer to get up, brew the moka pot and go?
Ease of Clean Up: Does your coffee maker require paper filters? Will you need access to water to clean up? Does the filter need to dry before packing? The following methods are fairly low-key in terms of cleanup, but this is still a point worth considering.
Types of camping coffee makers
Now that you have an understanding of what suits your camping style, let’s explore the best options out there.

Portable Espresso
This is our trusty favourite because we love a strong, delicious espresso. We’ve taken our Wacaco Nanopresso on multi-day hikes, overseas trips, and it’s a staple in our campervan.
“Experts in nomad coffee and expresso” Wacaco is the world’s first piston-driven handheld espresso machine. This is a game-changer to camping coffee. It’s the most portable espresso maker we’ve found on the market. The Wacaco Nanopresso packs down into a compact unit. Creamy coffee crema in the wild? Yes please!
Best for: The espresso lover willing to compromise on a little weight for excellent coffee.
Brand: Wacaco Nanopresso
Pros:
- Delicious coffee crema
- Real espresso from a portable coffee maker
- Has an inbuilt filter for a rubbish free clean up
- Compact design that packs away into itself
- Durable
Cons:
- Not as suited for hiking due to being heavier than a pour-over or coffee bags
- Has more pieces for assembly
- Not suited for groups
Brew Method:
Preheat the chamber by filling it with hot water
Grind your beans to a find grind. Fill the coffee basket with your fresh ground coffee and compress by tamping it. If you purchase the full kit it will include a tamper. Otherwise you can use the back of the scoop. There should be about 4mm of space from the top of the coffee basket. Make sure you clean any loose coffee from the rim of the filter basket
Put the filter basket into the Nanopresso and screw on the portafilter.
Fill the tank with boiling water, up to the line marked inside. Unlike other brew methods, it’s ok to use boiling water as it will lose heat while you pump it through and will cool before it reaches the coffee.
Screw the water tank onto the Nanopresso. Unlock the piston and flip the Nanopresso upside down.
Start pumping with slow consistent pumps to build up pressure inside the machine. You’ll know your coffee is fully extracted when there’s no more pressure in the piston. This will take 20 – 30 pumps. Your espresso should have a smooth, golden-brown crema.
READ MORE: Wacaco Nanopresso Review A Coffee Maker Purpose-Built for Nomads and Adventurers

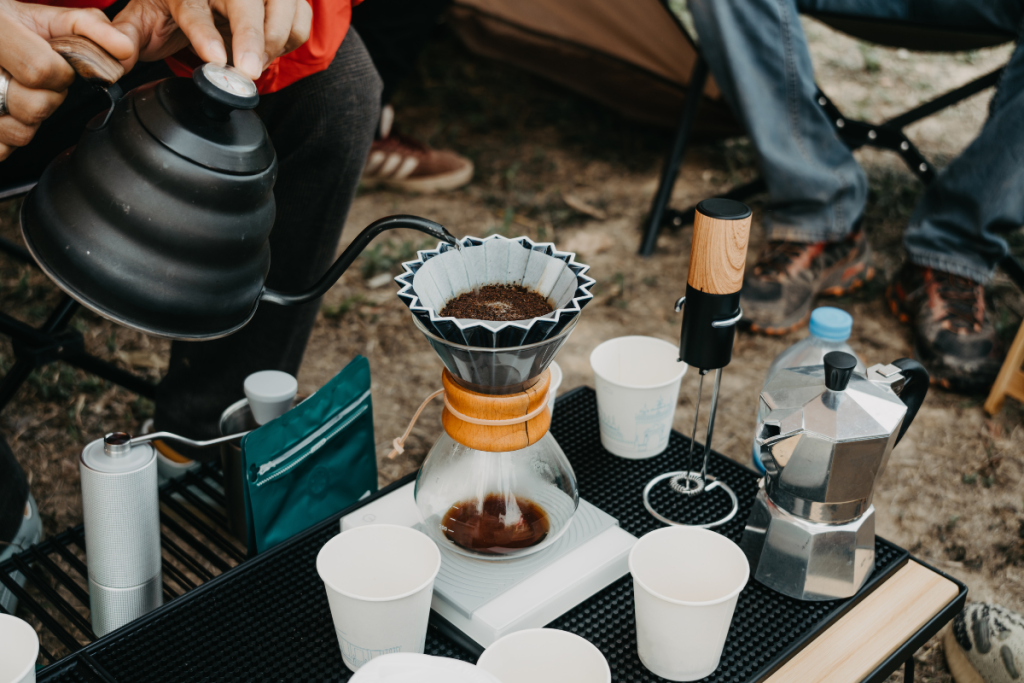
Pour over
The pour-over method requires little equipment for a tasty brew. These clever coffee makers can be extremely lightweight and pack flat, making them very portable. Ideal for hikers carrying all their gear on their backs. The method takes some getting used to, so it’s a good idea to get familiar with pour-over coffee before taking it camping. This compact style allows you to brew directly over a mug. The slower you pour, the stronger your coffee will be. It does take patience and a bit of skill.
Best for: Hikers who want weight and space-saving camp coffee options
Brands: Sea to Summit Frontier Collapsible, GSI Outdoors Ultralight Java Drip Coffee Maker, MiiR Pourigami
Pros:
- Affordable
- Lightweight
- Compact
- Usually made from stainless steel, silicone, BPA-free plastic.
Cons:
- Need stable ground sit cup and rest filter on top
- Some brands require filter papers
- The pour-over method requires some getting use to
Brew Method:
Ratio is 1:16 coffee to water
You will need a pour over coffee maker, filter (to prevent the grains ending up in your cup) mug, gas to boil your water, your favourite coffee.
Place the filter paper in the pour over cone and rinse thoroughly with hot water, making sure the paper is even and completely wet and preheated.
Set the pour over on your cup or jug (make sure you have a stable working space). Grind your coffee and fill the filter in your pour over cone. Dig a small well in the middle of the coffee.
Heat your water and remove from heat just before boiling. Pour water slowly over the coffee to soak it. Leave to sit for 45 secs. Continue to do this in rounds allowing it to drip through the coffee and seep as much flavour as possible. You want the water to drip through the coffee into the cup not pour into it.
The total brew time should be approx 3min The desired outcome is to bring out the most you can from the coffee that you are brewing,
Opt for a reusable mesh filter to save on packing and rubbish.

French Press / Plunger
You probably grew up seeing a French Press in the kitchen and wouldn’t think about taking it on the road with you. For French Press lovers, there are some excellent options designed tough to take on your adventures. Made with stainless steel or BPA-free plastic bodies, they are tough and much more suitable for the outdoors. Single-serve and built into a travel mug or the 1.4L STANLEY to serve the whole crew. The plunger is a great, low-fuss, all-rounder for a delicious brew.
Best for: A French Press is great for groups as you can brew 2 – 4 cups at once
Brands: GSI, STANLEY, Jetboil
Pros:
- Easy to use, no fuss
- Durable stainless steel and plastic (avoid the traditional glass)
- Variety of capacity options making a great option for groups
Cons:
- bulky for those doing multi-day hikes
- can take up to 5 mins brew
Brew Method:
Grind your coffee beans to a medium grind. If coffee is too fine sediment can creep through the filter or you can end up with a muddy consistency. If you are using pre-ground beans make sure they are stored in a vacuum-sealed container.
Add coffee to the plunger. The amount of grounds you need to add to a plunger will depend on how much you want to make and how strong you want the finished cup of coffee to be. The go-to ratio is 1:16 coffee to water. When camping you’ll most likely measure this by eye. Don’t stress about being too precise. After a few batches, you’ll have a pretty good idea of how strong you like it.
When brewing coffee, water should be just below boiling temperature. Let it cool down for 30 seconds after boiling.
Pour water in a circular motion to ensure the coffee is evenly covered. At first fill the plunger half way (or enough to soak the coffee) and allow to bloom for 30 seconds.
Fill the plunger to just below the top and let it sit for 4 minutes allowing a coffee crust to form at the top. After 4 minutes, break and stir the crust.
Insert the plunger and apply gentle steady pressure to push the plunger down.
Pour coffee into cups. It’s best to drink the coffee straight away or decant it into another jug. If the coffee is left in the plunger it can over-brew causing a bitter taste.
Stovetop Espresso
The Moka Pot is one of the most common stovetop coffee makers around. Invented by Bialetti in the 1930s, I remember first seeing people travel with these across South America. They are tough little coffee makers made from aluminum or stainless steel and can brew on a direct flame. Ranging in size from single espresso to 9 cups, they are extremely simple to use and clean and make a strong coffee. They are a bit bulky to carry, so more suited for those who have space in their luggage or campervan.
Best for: People who like a simple yet reliable coffee maker that brews strong Italian-style coffee
Brands: Bialetti, GSI Outdoors Mini Espresso Set
Pros:
- Strong and durable
- Easy to clean
- Strong espresso style coffee
Cons:
- A bit bulkier to carry on travels
- Get’s quite hot so not ideal for multiple batches
Brew Method:
If you have time, pre-heat your water. This will reduce the amount of time the moka pot has to sit on the stove, reducing the risk of accidentally “cooking” the grounds. You’ll avoid bitter coffee by doing this.
Unscrew the base and fill water to just below the valve.
Fill the filter basket with coffee. You don’t need to press and tamp the coffee, just even it out with the back of a spoon. Coffee from a moka pot is typically twice as strong with a ratio of 1:7 compared to the standard 1:16. A fine to medium-fine ground coffee is recommended.
Place the basket in the base of the of the moka pot over the water. Make sure no grounds are on the ridges where the pieces screw together.
Put the pot on the fire or gas stove. Wait and listen for it to start gurgling. Open the lid and you’ll see rich coffee oozing into the upper chamber
Aeropress
Designed in 2005, the Aeropress has since developed a cult following. A simple plunge-style coffee maker that you’ll see in people’s homes just as much as in the outdoors. They’ve released a more compact model, the Aeropress Go, which comes with a mug and lid that doubles as a travel kit. It does have more bits and pieces than the other simplified brew methods—there are 7 pieces to the kit—but they all fit inside the mug for safekeeping. The Aeropress Go gives you the option to brew different styles of coffee: espresso-style, Americano, and Latte. You can purchase a stainless steel filter (separately) to eliminate the need for paper filters on the road.
Best for: Coffee connoisseurs who like to customise taste, strength and style.
Brands: Aeropress Original, Aeropress Go
Pros:
- The Go model is compact with all pieces fitting into one cup with a lid
- Brews in under a minute which is one of the fastest brew methods
- Makes a variety of styles of coffee
Cons:
- Not good for groups
- Has a lot of pieces (easier to misplace)
- Requires filters but you can purchase a reusable stainless steel filter
Brew Method:
Heat your water and remove just before boiling point.
If using a paper filter, rinse and place in the filter cap. If using a stainless steel filter it can be placed straight into the cap.
Screw the filter cap into the chamber and place on top of your coffee mug. Make sure you have a stable surface to apply pressure on the plunger.
Use the Aeropress scoop to put coffee into the chamber. One scoop for a single espresso, two scoops for a double espresso.
Bloom your coffee. Similar to the pour over method, pour enough water into the chamber to cover the coffee. Then allow 45sec to bloom.
Fill water up to the 1 on the chamber for an espresso or 2 for a double espresso.
Stir gently for about 10sec. Insert plunger 1cm into the chamber and let sit for 30sec to brew.
Apply gentle, constant pressure to push the plunger down into the chamber. Voila! You will have served a lovely espresso. Add water for an Americano.
Why grind?
Grinding fresh for every cup might sound a bit overindulgent, especially in the wild. Basically, lots of the good stuff in your roasted beans goes poof soon after being ground (source). That’s why we highly recommend traveling with a grinder if you have the space.
Whole coffee beans stay fresh roughly three times longer than pre-ground coffee. This means the flavorful oils stay locked safely inside the bean. As soon as coffee beans are ground, those oils are exposed to air and start to deteriorate. The best your espresso is ever going to taste is when the beans have been freshly ground.
Storing your beans or fresh ground coffee in an airtight container will protect the flavor profile as best as possible.
If you’re willing to go that extra mile for fresher tasting coffee, there are some great portable grinders available.
Brands: Wacaco, Porlex, Timemore
Final Brew Wisdom
- Make sure your coffee is stored in a sealed airtight container away from sunlight. Preferably in a cool area.
- Allow time for the “blooming” process. Simply pour water on the fresh coffee grounds and let them sit for 30 to 40 seconds. This allows time for the gasses trapped in the coffee to escape and will enhance the final flavour. You’ll see the surface of the coffee bubble up. If you don’t see this bubbling foam it’s a sign your coffee is old and possibly stale.
- Use water below the boiling point to avoid burning your coffee. If you bring water to the boil, just let it sit for 30 seconds before adding it to the coffee.
RELATED ARTICLES

Best Portable Coffee Maker – Find Your Perfect Match For Life On The Road
We’ve compared the best portable coffee makers for campers, hikers, and travellers. Discover which compact brewer is right for you

Wacaco Nanopresso Review: A Coffee Maker Purpose-Built for Nomads and Adventurers
Why settle for subpar coffee when you can have a real espresso? Learn why the Wacaco Nanopresso is our favourite portable coffee maker
